Android App Development Cost
Did you know that iOS is going to disappear from the Asian market anytime soon?
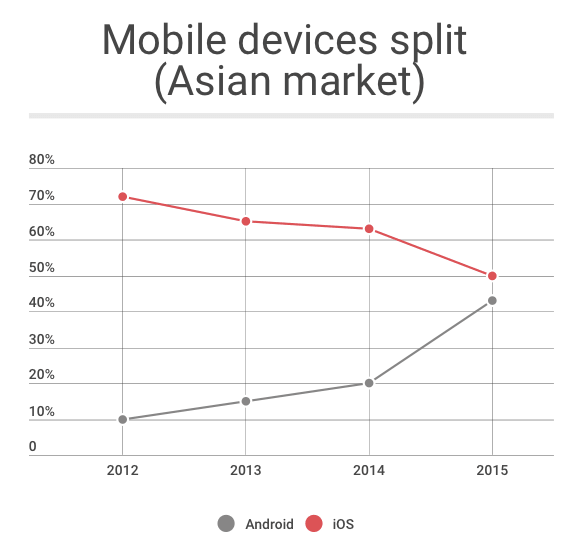
Despite the enormous number of Apple gadgets throughout Asia, users here differ a lot from Americans – loyal lovers of i-devices. The trend is decreasing with iPhones – from 72% of all gadgets in 2012 to 50% in 2015.
Asian citizens got used to seeing technologies changing rapidly and they observe a lot more interesting technologies around than Apple. They also tend to prefer phablets for multiple purposes. Apple is not something special for them anymore, not to mention, it’s much more expensive than a huge variety of Android-charged gadgets.

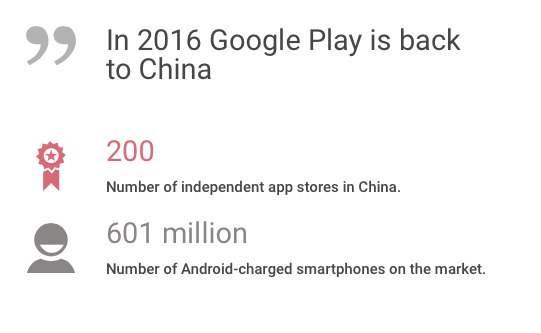
But anyway, it’s not the objective of our discussion today. Just to let you know that picking Android for mobile app development is the right choice. What’s more, Google Play Store is coming back to China this year, not to mention – it dominates in the Asian market even now.
If you ask me, how much would it cost, even roughly, to build an average Android app, the answer would be – I have no clue really. That’s why I’ve been digging for precious bits of info to put together everything that builds up the price of a typical Android app. So here is a checklist of what you’ll know after reading the article:
- what’s the current situation with Android apps globally;
- peculiarities of Android mobile app development;
- what features are trendy in Android apps among mobile application developers;
- factors that influence your Android app’s price;
- and finally, elements that build up the final cost of your mobile application.
I’m positive that you’ll become true experts of the Android apps world and will be able to calculate rough budgets for your future Android app projects. So let’s dive right into it!
SEE ALSO: How Business Applies Sentiment Analysis
What’s the hype about Android apps
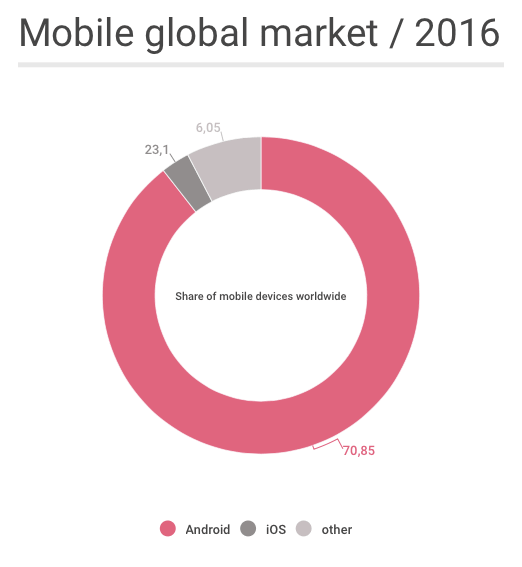
There basically is a range of reasons why Android apps are more beneficial than iOS ones. Let me just leave one figure here for a start:
The following features make the Android app more profitable to build:
- Java – this powerful coding language is a universal tool, which makes Android mobile applications highly portable to other operating systems such as Ubuntu, Symbian, and Blackberry. This can also become a deciding success factor of, say, a small startup, short on budget;
- Availability – apps published in Google Play Store are ready to download in a couple of hours after their launch unlike iOS apps (can be previewed for weeks before approval). The same with updated versions – they can be uploaded multiple times a day in response to feedback or complaints. Another benefit is the ability to publish a beta version of the app and provide access to a limited number of testers. That’s a cool and dynamic way to improve an app on the initial stage and then release it all polished and complete to a wide audience;
- Favorable entry-level – as far as iOS is a kinda closed network, it always requires more permissions to pass, payments to submit, and all that jazz. For Android it’s more user-friendly and easier: you can build an Android app on Mac, Linux, or Windows, whereas iOS apps – on Mac only; to register as a developer – one time $25-payment for Android vs monthly $99 for iOS;
- Profitability – currently Android apps become as profitable as iOS ones (even more rewarding in some cases), despite existing prejudice that iOS is used by richer, more open to paying, users. And again, thriving market share is the reason for that – almost 2 billion devices with the Android engine on hand for the year of 2015, according to Statista.
CHECK OUT MORE: IOS vs Android app development
Android in-app trends – what features to rock
Mobile technologies skyrocket on a daily basis and fresh trends continue appearing in the apps enhancing the user experience, productivity, and reliability of the app.
More security
Security is something taken for granted and absolutely expected by users. That’s why this aspect is given much attention recently and for a good reason. The thing is that for Android hacking issue is very actual and there are multiple cases still registered.
Want it or not, companies pay attention to this aspect religiously, coz alternatively, it can lead to a significant loss of the business.
A convincing example is online transactions. As they are getting more and more use within mobile applications, Android is working out powerful security solutions to ensure the full defense of personal user data.
Latest solutions allow building separate business environments for applications in order to protect any important data. This is expected to grow the number of enterprises adopting this OS starting from 2016.
Less time for development
Despite the well-known fact that Android apps take more time to be built (details will be broken down further in the article), the overall trend is still about shortening the time for building. The reason for that is shifting to a simple, clean design and interface of the application. “UX goes first” is trending and became a major focus for developers. And this trend is well-known mostly for its’ simplicity and minimalism.
READ ALSO: How Long Does it Take to Develop an iOS or Android Mobile App
Businesses want their apps built
Most companies already do their businesses online. As the majority of people spend most of their time on the phone, corporations must adapt to that swiftly. Enterprises decide to build specific commercial applications to stay in touch with their customers, not to mention, they also enhance consumer’s experience within the company. A positive and effortless user experience always equals loyalty, right?
Massive
Multiple surveys confirm that by the year 2018 smartphone payments will reach the point of almost $ 120 billion internationally. And it will be more than 50% of all online transactions. These figures speak for themselves. Just implement this feature and make your customers pay in a matter of clicks.
Assimilation of wearables
Smartwatches, smart bracelets, fitness trackers. More and more simple people change their conventional watches to some smart accessories. Companies integrate them to increase business productivity.
The best part is that Google provides a range of guidelines for Android Wear software and a lot of manufacturers implement it for their gadgets gratefully. This only means that most Android users will get some sort of smart wearable device sooner or later. And you wanna be armed for that.
What it takes to build an edgy Android app
Now that you know the Android app is a good deal, it’s time to outline the major peculiarities of the Android app development process. This will also influence the price of the application at the end of the day.
One prime statement for Android app development is that it usually would cost you somewhat more expensive than one for iOS. Let me unpack what’s so special about Android mobile development, which leads to a longer time to implement an application compared to the iOS one.
Number of lines
Yes, as easy as that. According to our analysis of QuePro and SpotNews Android apps, built by our team, it takes about 40% more code to complete an Android app than the iOS version. It’s not necessarily all hand-written code, part of it is auto-generated, but still, developers read it, debug and maintain.
[The App Solutions Project for All Square]
By the way, a trendy “clean architecture” requires even more lines of code because of the highly-structured coding approach.
Total of hours
Obviously, such a large difference in the volume of development work results in increased working hours for them. And it’s almost the same difference – up to 30% more time compared to iOS development hours.
Slower emulators
A significant factor that slows down the rhythm of Android development is the operational speed of Android emulators – they seem to be quite crawling against iOS emulators and you can’t fight it yet.
High fragmentation
Have you ever tried to calculate the number of all Android-charged gadgets?
Correct, it’s getting closer and closer to a range of impossible tasks. Whereas, iOS devices are on everybody’s A-list. And the range is quite thin. So again, it takes much more effort and time to test and fix issues for every screen.
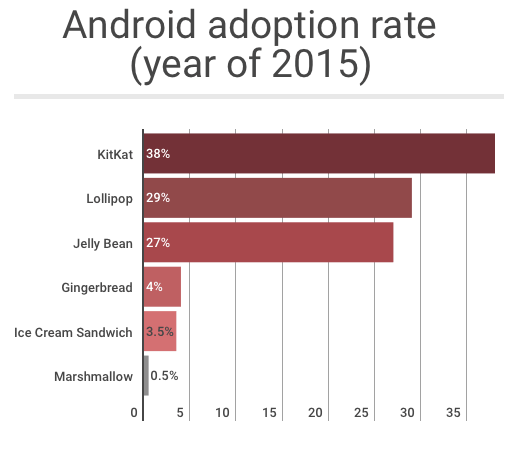
What about all versions of Android operating nowadays in the global market? About 50% of iPhone owners adopted the latest version of iOS in 4 days after its’ release, while Marshmallow 6.0 is run hardly on 1% of Android smartphones.
Android app development cost
Pricing model
Now we know that the cost of the app in most cases depends on the number of hours spent to build it. This is a scenario majority of app development companies usually follow – the so-called Time & Material payment model. This one is very flexible and you are able to make changes and improvements along the way, at the same time optimizing tasks for developers and reducing the cost for inconvenient features or tasks.
On the other hand, there is a Fixed Price model. Here you agree on the final product from the very beginning and it’s much more difficult to implement changes because the development process here works in a different way – not with short iterations, but just delivering a complete project on time.
Both of these schemes will result in different prices. Usually, fixed price tends to be higher as the development company adds various risk factors to it.
Dedicated team
Another important component that builds up the price of your app is members of the team. A little disclaimer here! These are not only mobile app developers, who are creating your product.
An ultimate list of professionals whom you need to craft and polish your application:
- Project manager – a professional who heads the whole team, communicates with you as a client, suggests some handy technical solutions, joins up the squad, and assures of delivering the project on time;
- Senior developer or architect – this is a leading developer and a person who creates the whole strategy of the upcoming app;
- Android coder(s) – guys who are implementing your idea into a unique piece of software;
- Designer(s) – these are wizards of UX/UI design, they make application user-friendly and appealing to watch and use;
- QA Engineer(s) – people in charge of final testing and debugging application, making it go like clockwork;
- Technical writer – a person who creates a script of the whole idea and implementation of the app: from logic to changing screens and functions of every button.
This looks much like a skeleton of the dream team you need to build an Android app. Depending on the complexity of the desired product, the number of people can vary, but virtually all functions are distributed among these experts.
Kind of application
Table-based app – simplest among applications. Enables you to display information, provide options and redirect to additional materials.
Database app – more complex ones, good to present a wider range of data. These are usually connected to various websites or any other online services and broadcast requested information from there, which makes them more complex to build.
Dynamic app – very similar to a previous type and differs only by not really connecting to outer resources, but extracting info from them with the help of API.
Gaming app – known as most complex to craft. They can vary by functionality and integrated technologies, at the same time they are the most costly among all applications.
Among other, minor, influential aspects might be the business model of your app (or simply how you’re going to earn money with your app) and the complexity of the design.
Now it’s time to go ahead and look for the best app developers to entrust your important task to. You might look for your people in various regions of the world and hourly rate will differ of course:
- USA/Canada-based dev teams – $50 to $250/hour;
- Western Europe – $30 to$170/hour;
- Eastern Europe – $20 to $150/hour;
- Australia – $50 to $150/hour;
- India – $10 to $80/hour.
Once a choice on mobile application developers is done, you can discuss all functionality of the application and get a rough estimation of the required number of hours to build it. Afterward, you simply add all hours of your team and multiply these on the hourly rate!
Concluding thoughts
As you can see, Indian mobile app developers will charge you the least out of all regions’ representatives. Just make sure you check the portfolio of the particular squad along with looking through the entire reputation. After all, famous rumors around Indian development “story” going on for a reason.
Eastern European professionals are famous for their high professionalism together with moderate pricing, so they are worth considering for sure.
Australian and American app developers are paid the highest out of this range. No need to worry about the quality and all the procedures in this case.
Just a hint for you, guys, – these will be in most cases East Europeans relocated to the US or Australia sitting there 🙂
Now congrats! You got good food for thought on the subject of developing your baby! A cherry on top – you can invest in a project in parts, so it’s not crucial to have the whole budget from the very launch of the project.
Try our calculator to figure out the cost of Android app development.
Want to receive reading suggestions once a month?
Subscribe to our newsletters